For the most part, I've been toggling between two high performing Rakdos Reanimator variants this past week. My primary goal is to find the best Standard deck in preparation for the upcoming Regional Championship at DreamHack; and Rakdos Reanimator has a lot of good things going for it.
Before we go further on, these are the two main skeletons I've been working from:
Rakdos Reanimator | ONE Standard | Mizl1zzie, 2nd Place MTGO Standard Challenge 2/19/2023
- Creatures (11)
- 3 Sheoldred, the Apocalypse
- 4 Atraxa, Grand Unifier
- 4 Bloodtithe Harvester
- Planeswalkers (1)
- 1 Liliana of the Veil
- Instants (8)
- 1 Sheoldred's Edict
- 2 Abrade
- 2 Go for the Throat
- 3 Big Score
- Sorceries (4)
- 1 Invoke Despair
- 1 Soul Transfer
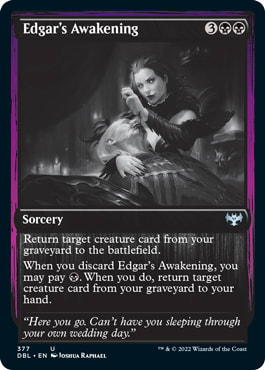
- 2 Edgar's Awakening
- Enchantments (8)
- 4 Fable of the Mirror-Breaker // Reflection of Kiki-Jiki
- 4 The Cruelty of Gix
- Artifacts (2)
- 2 Reckoner Bankbuster
- Lands (26)
- 1 Mountain
- 6 Swamp
- 1 Sokenzan, Crucible of Defiance
- 1 Takenuma, Abandoned Mire
- 2 Ziatora's Proving Ground
- 3 Xander's Lounge
- 4 Blackcleave Cliffs
- 4 Haunted Ridge
- 4 Sulfurous Springs
- Sideboard (15)
- 3 Duress
- 1 Soul Transfer
- 2 Unlicensed Hearse
- 4 Cut Down
- 2 Jaya, Fiery Negotiator
- 1 Gix's Command
- 2 Brotherhood's End
Rakdos Reanimator | ONE Standard | MAFS, 3rd Place MTGO Standard Challenge 2/19/2023
- Creatures (10)
- 2 Sheoldred, the Apocalypse
- 4 Atraxa, Grand Unifier
- 4 Bloodtithe Harvester
- Planeswalkers (2)
- 2 Liliana of the Veil
- Instants (6)
- 1 Abrade
- 1 Cathartic Pyre
- 1 Cut Down
- 1 Sheoldred's Edict
- 2 Go for the Throat
- Sorceries (5)
- 1 Soul Transfer
- 2 Brotherhood's End
- 2 Duress
- Enchantments (8)
- 4 Fable of the Mirror-Breaker // Reflection of Kiki-Jiki
- 4 The Cruelty of Gix
- Artifacts (3)
- 3 Reckoner Bankbuster
If you recognize MIZL1ZZIE's list, it's the one we introduced last week... With a higher performance in the Standard Challenge, it's also the first one I started to work on. The defining elements of this deck are three copies of Big Score and two copies of Edgar's Awakening.
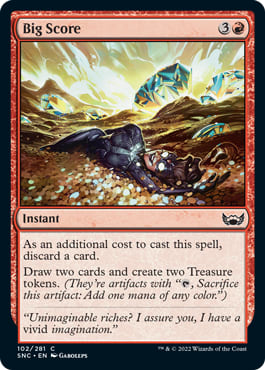 |  |
Big Score gives the deck more explosive possibilities. And while it might seem counterintuitive... Also a clearer route to "fair" play. How does that make sense? Obviously Big Score is a discard outlet, giving you a way to put Atraxa, Grand Unifier into the graveyard for a pairing with The Cruelty of Gix...
Except it also produces two Treasure tokens! Those tokens can be used to cast Atraxa... And even on-curve.
Big Score costs four mana. Dollars to donuts drawing two cards - three with your natural draw step - will find you land #5 (provided you didn't already have it)... Meaning with two Treasure tokens you can hard-cast Atraxa. This is especially important because of the goofball Green, White, and Blue mana in her top-right. Those colors aren't easy to come by.
Why might you do this?
Against any deck with Counterspells, it might make sense to force the opponent to have multiple ways to say "No" to your game plan. If you discard Atraxa (your most powerful threat), you, by definition, don't have it in hand. Then all they have to do is stop your reanimation spell and you're probably cooked. This way you can force the opponent to have two or even more permission spells or fall to the wrath of your mighty draw-seven.
MIZL1ZZIE's list also includes a bunch of powerful five-mana spells: Invoke Despair as a singleton, and Edgar's Awakening. In the same spirit as hard-casting Atraxa, it is sometimes valuable to play The Cruelty of Gix on Chapter I. Go for a slow grind of three cards, instead of a single sledgehammer with Atraxa. This way you can check out what resistance the opponent might have... Often this will be valuable because you take the opponent's Atraxa. Sometimes you search up Atraxa with Chapter II, and discard it with a Blood token for Chapter III. Other times you get the singleton Invoke Despair and wallop the opponent from multiple angles.
Edgar's Awakening is redundancy on The Cruelty of Gix. Sometimes the opponent can kill Atraxa and you just need another reanimation card. Sometimes you get fun grinds with an early Bloodtithe Harvester, using it, then buying it back cheaply with B + Fable of the Mirror-Breaker // Reflection of Kiki-Jiki or one of the innumerable discard outlets in this strategy.
Recently I've been playing more the MAFS style.
I initially played MIZL1ZZIE just because it finished higher in one event, but my apprentice, podcast, and play-test partner Roman Fusco told me he wasn't a huge fan of either Big Score or Edgar's Awakening.
The MAFS list is a little less all-in than the MIZL1ZZIE one. It's defining characteristic is three Mountains. Those Mountains make Invoke Despair a potentially disastrous pull, so MAFS doesn't play it. With those Mountains this deck is a little bit better at making ![]()
![]() , so it can splurge on Brotherhood's End.
, so it can splurge on Brotherhood's End.
I like the MAFS list because it puts up such a better fight against early aggro. Cathartic Pyre is medium at everything. It's a worse discard outlet than Big Score... But for half the cost. If it were only a removal spell it'd be laughable... But instead it's passable. Cathartic Pyre also has the superpower of being only two mana, so it can help slow down a deck like Soldiers before they completely run you over.
I wasn't sure if I'd like cutting Big Score initially... But it's been more than serviceable. You can sometimes end up in a weird spot where you have nothing to discard (especially if you're working Liliana of the Veil, or otherwise in topdeck mode), so MAFS gets a little more resiliency just by not playing that card. Again, it's way, Way, WAY better at defending itself early.
What these two builds have in common is a shockingly complex mana base for a two-color deck. MIZL1ZZIE is a little more complicated because of Invoke Despair, but neither one is as straightforward as you might assume. Both decks have Ziatora's Proving Ground and Xander's Lounge. They both play the relevant Neon Dynasty Legendary Lands and all twelve in-color dual lands.
It's the interplay between the dual lands and the Streets of New Capenna Triomes that is most interesting to me today.
How (not) to Lose on Turn Two
You drew a Blackcleave Cliffs in your opening hand. Yay! Fast lands rule! Play it, right?
Maybe?
A Blackcleave Cliffs in your opener is going to lose a lot of its especial value after turn three, but that doesn't mean you should play it on turn one... Or maybe even turn two! It's tough and confusing... Especially when we start getting tension between Blackcleave Cliffs and Haunted Ridge. I basically never want to play Sulfurous Springs, but it's right to play all four, and if the bar is casting your spells... Springs casts everything.
Let's look at a couple of opening hands.

This is obviously a keeper (and a relatively simple one).
When you look at a hand like this, there is really only one question to ask yourself:
What is my curve going to look like?
In the dark, this hand can't do anything on turn one, but can play Bloodtithe Harvester on turn two, then follow up with either Liliana of the Veil or Fable of the Mirror-Breaker on turn three. We have the mana to do all that without slowing down.
We will probably want to play Fable if we draw Atraxa. That would give us a free shot not only at discarding Atraxa on turn four, but drawing into reanimation spells. If we attack with Fable's 2/2 Goblin token, we can jump straight to five and put the Atraxa we haven't drawn yet directly into play.
We will probably want to play Liliana most of the time. Getting her on the battlefield is great against control, and can remove the opponent's first blocker. Liliana is worse for setting up Atraxa reanimation because she doesn't help us draw into Edgar's Awakening or accelerate our mana... But she can still help, of course.
So, what's our proposed land drop order?
This is a great example where we don't want to play Blackcleave Cliffs on turn one. If we do, we're going to be stuck playing Haunted Ridge on turn two... Meaning we won't be able to play our 3/2 Vampire.
This one is a little trickier:
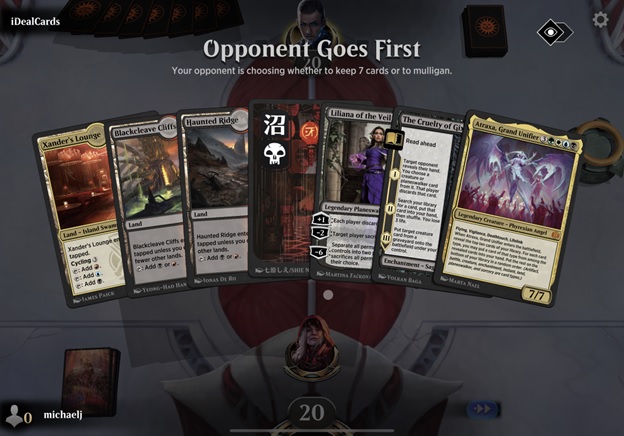
Any opening hand with Xander's Lounge or Ziatora's Proving Ground forces you to ask ask a second quesion.
Do I ever actually want to tap this for mana?
That might sound like a silly question when discussing a land drop, but the allure of Triomes is that you can presumably cash them in for action later in the game.
The secret of these two lands in Rakdos Reanimator is that Ziatora's Proving Ground makes ![]() and Xander's Lounge makes
and Xander's Lounge makes ![]() ... So between them you can get a lot of the way to an Atraxa hard-cast.
... So between them you can get a lot of the way to an Atraxa hard-cast.
In the dark I would be biased toward playing Xander's Lounge. We have three other lands, but on the plus side, we're going second so we have the opportunity for some additional information.
Playing the wrong land not just on turn one but turn two will often cost you the game in the high tempo environment of Standard. Let's put it all together!

As you can see, for this one I leaned into that bias and started on my Triome. I had a couple of reasons for this. First of all, this hand didn't have any way to reanimate Atraxa, so I thought I might go the long way (maybe even with help from Reckoner Bankbuster) for a hard-cast.
Second, at the point that I played the land my opponent had shown me Blue mana, so I thought I might end up in a long land drop shootout.
It's obvious I'm going to play a land that enters the battlefield untapped this turn. But which one?
I'm unlikely to tap out for Reckoner Bankbuster with such a juicy Sheoldred's Edict target in play... But which land to drop really matters.
If you think it doesn't matter, you could very well lose around turn four. Right now, you can make any land drop and then pay Blackcleave Cliffs on turn three; it will [still] enter untapped, and you can two-for-one the opponent with Brotherhood's End if need be.
But not dropping Blackcleave Cliffs here is going to cost you in the long term!
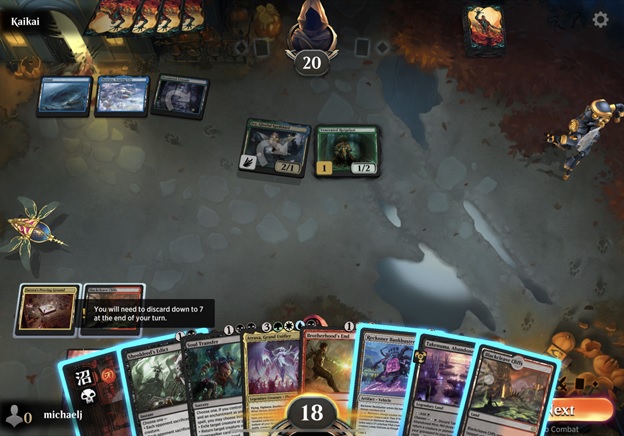
It was serendipity that I took that first screen shot!
Because I drew another Blackcleave Cliffs! Do you see if we had made a Swamp drop (or even worse, the Takenuma) we would be stuck with a tapped Blackcleave Cliffs at some point in the future? It's not that everything lines up perfectly all the time... But we can surely prevent costing ourselves games that we don't have to.
In Standard, with these complicated mana bases even in [essentially] two color decks, one of the best ways to safeguard your win rate is to make the right land drops in the first three turns. Ask yourself what you want your curve to look like, and choose the land drops that can facilitate that. In the case that you're going to play a land that enters the battlefield tapped, ask yourself if it should be your conditional dual land or a Triome. Will you need this Triome for colors later? Or do you have an overabundance of mana, allowing you to plan to cycle it when you have a free turn?
The answers to these sequencing questions will have a telling impact on how much you win... Especially when under pressure from insane cards like Venerated Rotpriest.
(BTW, I won this match).
LOVE
MIKE