One unfortunate thing I’ve had to deal with as I improve as a 3D alterer is that the better I get, the longer it takes me to make a card. You might be surprised to learn that; it definitely surprised me, since I was expecting the opposite to happen. It’s true that as I get more experience, I become better and faster at the individual skills involved, from visualizing layers to cutting pieces to gluing things together. However, as I’ve improved, I’ve also changed my approach to making cards.
When I first started making 3D cards, I worked almost exclusively with basic layers. I usually did a bit of detail work, but not very much. Most of the first fifty or so cards I made were chosen because they had art that I knew would be easy to alter.
Since I started working on Commanders, that’s no longer an appealing option. If I chose my Commanders based on how easy their art is to 3D, I’d be stuck with decks led by guys like Tobias Andrion. Occasionally, I find a good one that can be made 3D almost entirely with simple layers, like my Atogatog:

Other times, I find myself working on cards that have very little going on in the art other than the Legendary creature. Making this partially foiled Mangara of Corondor was challenging because I couldn’t figure out a way to 3D the storm that would look good, so I only had Mangara and the ground beneath his feet to create depth.

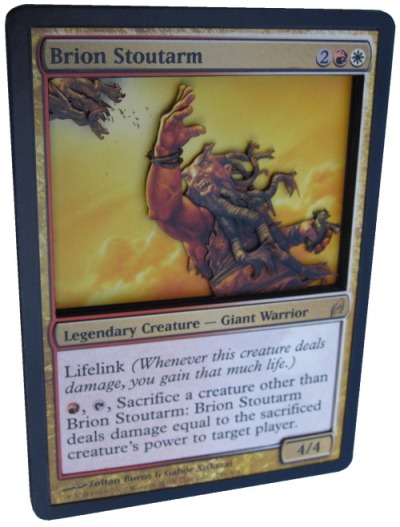
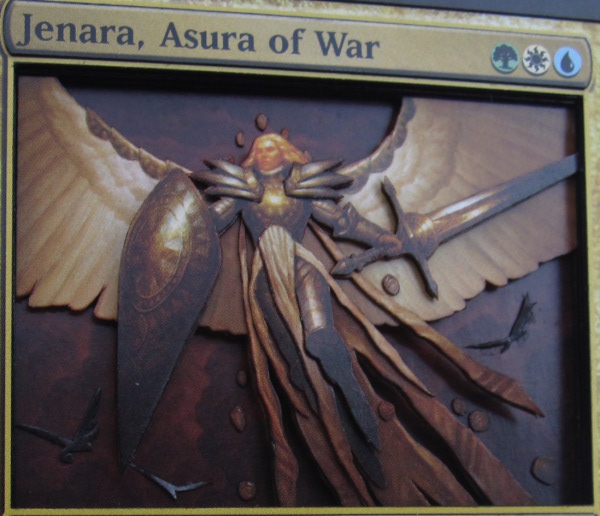
Recently, Debbie (wonderful editor, co-host of Avant-Card Show, creator of the Llanowar Sentinel) contacted me about making 3D cards for a couple of her co-hosts. Both of the cards chosen were ones that I had wanted to make for a while: Jenara, Asura of War and Brion Stoutarm. However, they also both were similar to Mangara in that most of the 3D would be in the main character since there is little else in the artwork of those cards.
Today, I’ll be going through the process for making a 3D Brion Stoutarm. You can also jump to the end if you want to see the completed Jenara.
Starting Brion
At this point, I often take some time to stare at the card’s art and figure out what my starting layers will be.
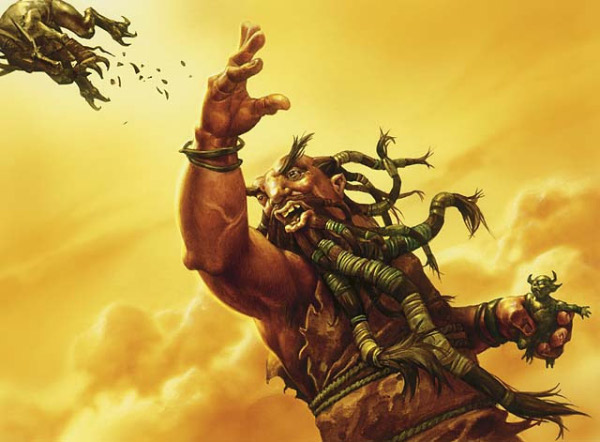
As I said, it’s pretty clear that there won’t be much in the way of basic layers. There’s the goblin in the foreground, Brion in the middle, and the sky in the background. What this art has a lot of is overlapping details. A few stand out to me immediately:
- Brion’s right arm should come from inside his shirt—be between the front and back parts of the shirt.
- Parts of his beard connect smoothly in a way that means a single detail piece will be both in front of the shirt and tuck behind the arm.
- Interweaving all of the locks of hair will take a lot of pieces.
- Detailing each of his hands will take a lot of pieces.
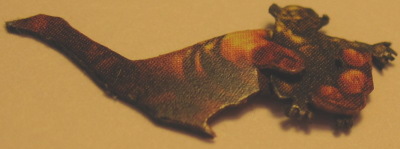
Because I know that I will be doing a lot of detail work on Brion himself, I know that I’ll want a lot of large scraps to work with. This means that I’m free to make each piece of the goblin that Brion is throwing into its own layer. I start with those:

These three pieces will be stacked to make the goblin’s body.
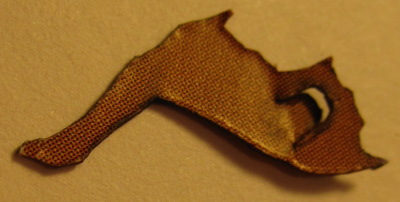
Next, I cut my primary Brion Stoutarm layer:
When I cut it, I’m not sure if that is what it will look like in the end, but it’s a good place to start. Some parts may need to be removed later.
The first time I cut Brion’s right arm, I leave his entire hand intact, but eventually decide to feather out the fingers, so I cut his index and middle fingers off of the arm.
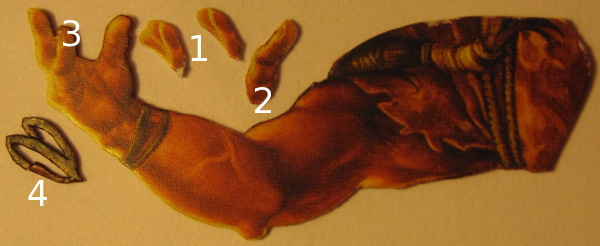
- Here are the pieces I use to feather out the fingers. Gluing together multiple tiny pieces with almost no overlap is difficult and time-consuming because you can’t just glue them and walk away; they’re small enough that they can shift just from weight during the drying process.
- The back of the base of the little finger is shaved off so the finger will attach smoothly to the rest of the hand.
- The little finger’s tip is still present on the arm piece in this picture, but I remove it before gluing the little finger onto the hand.
- The bracelet is a pretty flimsy piece, so getting the three tabs bent behind the wrist without creasing the visible part of the bracelet is a challenge.
After assembling the arm and testing how it looks inserted into the primary Brion layer, I decide that the part of Brion’s shirt that borders the arm hole needs to be shaved down:

For the giant’s left arm, I use two copies of his arm to cut these pieces:
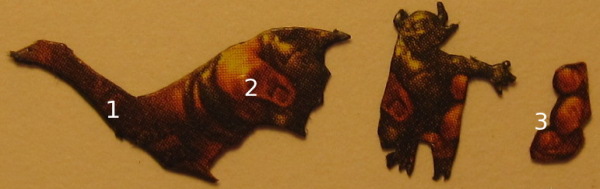
- This tab will be used to glue the completed arm to the back of the primary Brion Stoutarm layer.
- In order to fit the goblin under the thumb, the thumb will need to be cut away and the palm bent back.
- The fingertips are cut from the same copy of Brion as the arm.
As mentioned, I cut the thumb free and bend back the palm:
In order to get the goblin to fit tightly into the corner between the thumb and palm without warping the shape of the hand, I shave off part of its back on that side. After gluing him into place and gluing the fingertips onto his side, the completed arm looks like this:
The most difficult part of Brion is his beard. The problem is that the way his numerous locks of hair overlap and intertwine does not lend itself to full detailing. This is because multiple locks are connected at one point but overlap at other points. In situations like this, as an alterer, you’ll need to decide whether to underdetail or overdetail. I usually fall somewhere in the middle, underdetailing some spots and overdetailing other spots.

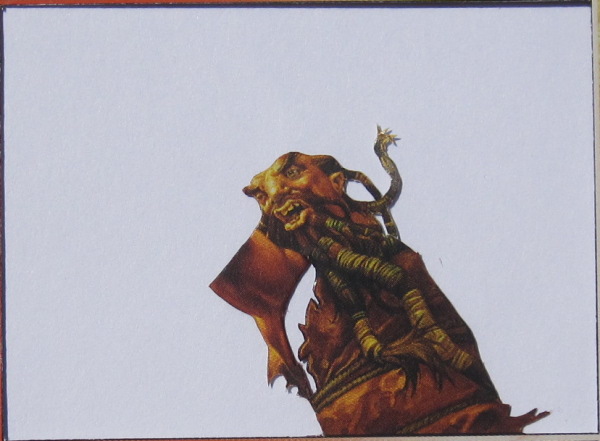
In addition to those five small pieces, I cut Brion’s head piece, which looks like this:

I cut the connection points outlined by green so that I can raise the main lock a bit and simulate tucking the smaller locks under it. Since the lock behind the giant’s ear will be visible in this piece, I remove it from the primary Brion layer, as you can see in this picture of a partially constructed Brion:
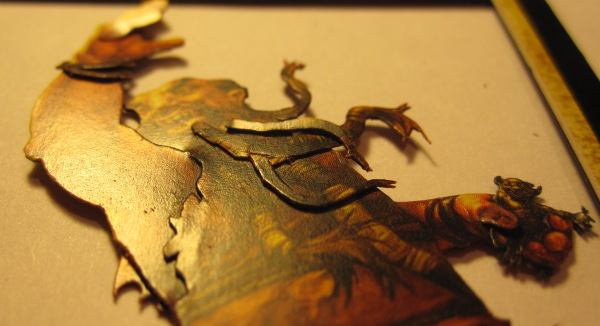
As you can see, both arms are attached, and a couple of locks are in place. All that’s left to do is attach the head and the rest of the locks, and then construct the rest of the card!
Finishing Up
The finished stack is like this:
| Bottom Layer: | Random common |
| Layer 2: | Brion Stoutarm full art |
| Layer 3: | Spacer |
| Layer 4: | Spacer (Brion’s left arm) |
| Layer 5: | Brion Stoutarm’s body (primary layer) |
| Layer 6: | Spacer (Brion’s head and arm) |
| Layer 7: | Spacer |
| Layer 8: | Spacer |
| Layer 9: | Spacer |
| Layer 10: | Goblin Body 1 |
| Layer 11: | Goblin Body 2 |
| Layer 12: | Goblin Head |
| Layer 13: | Brion Stoutarm: Art and text box removed |
| Layer 14: | Info boxes and black border raised |

In addition to having little to layer other than the main characters, Jenara and Brion share another challenging aspect: small floating objects. On Jenara, it’s her sigils; on Brion, it’s the bits of debris trailing behind the boggart that he’s chucking through the air. For examples of this type of challenge on other cards, consider the floating orbs around Sharuum the Hegemon or the bits of flame flying away from Ishi-Ishi, Akki Crackshot.
For Jenara, I raised the sigils as much as I could, and in the finished card, it looks natural to have some of them floating slightly behind her.
On Brion, you may have noticed that I didn’t actually do anything with the debris. In his case, I trusted the 3D elements of the card to draw the attention of the viewer so that the debris goes unnoticed.
If you have thoughts on a potentially better way to handle small floating objects, please let me know in the comments. As much as my process and skill set have changed, I’m always looking to try new things. During GenCon, I finally got to see a 3D card made by Master Ookubo, and it gave me ideas for new techniques that I want to try soon—I’ll be sharing the results in a future article!
Drew Sitte
AlteredCity at gmail dot com
@AlteredCity on Twitter