When I started playing Commander, the first handful of decks I made were gimmicky decks. My Karona, False God deck was filled with random effects designed to increase confusion and chaos. Norin the Wary was chosen to lead my mono-Red deck simply because he seemed like the worst option. Atogatog headlined a deck featuring such all-stars as Chronatog and Foratog (in a deck with two Forests).
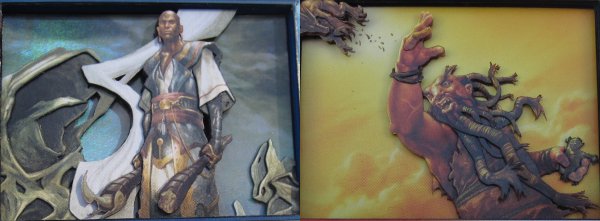
One of the first “normal” decks I built was led by Intet, the Dreamer. I chose Intet just because I had the 3D already made and enough of the cards I wanted to use fit in her color identity.
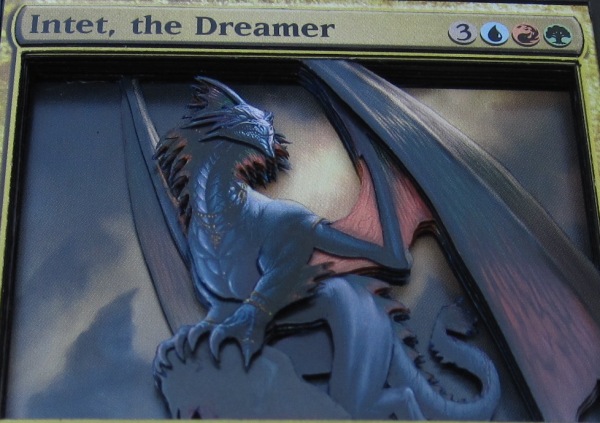
During PT: Philly, I met Uriah from CMDRDecks, a YouTube channel that features Commander decks from players around the world. If you’re curious about my Intet list, you can check it out here.
When the Commander decks came out earlier this year, Intet was immediately outclassed by both of the other Legendary creatures in Mirror Mastery. Since a big chunk of my deck is built around controlling the top card of my deck, I’ll be sticking with Intet for the time being, but Riku of Two Reflections is likely the best of the three, and he has found a home within Intet’s ninety-nine.
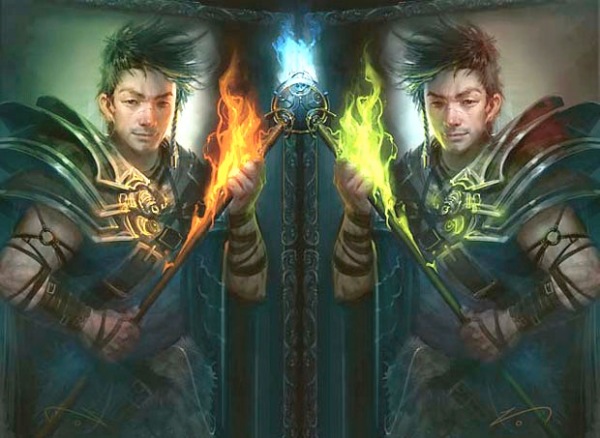
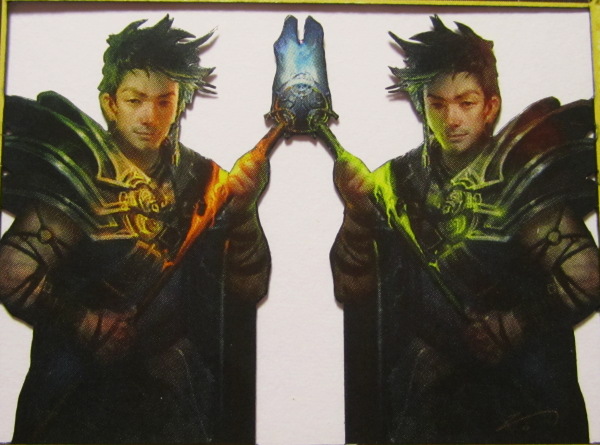
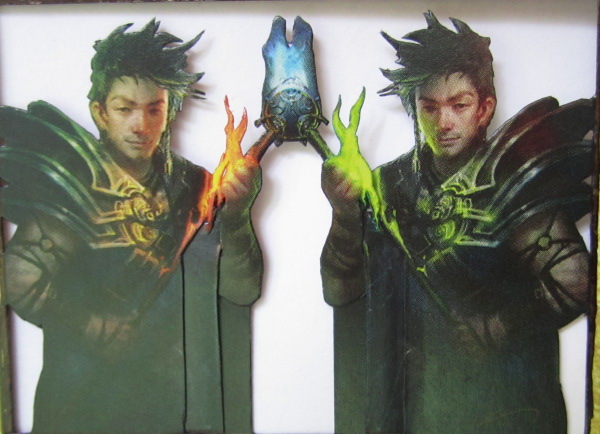
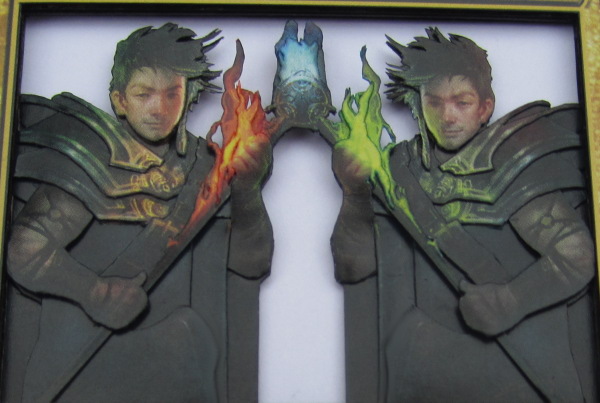
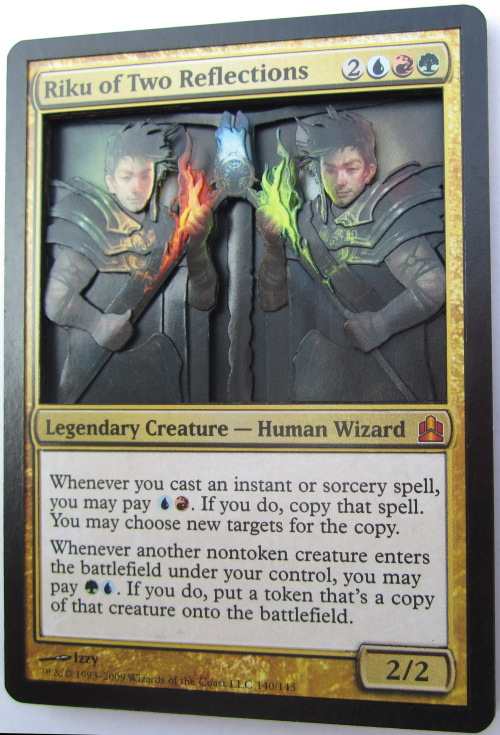
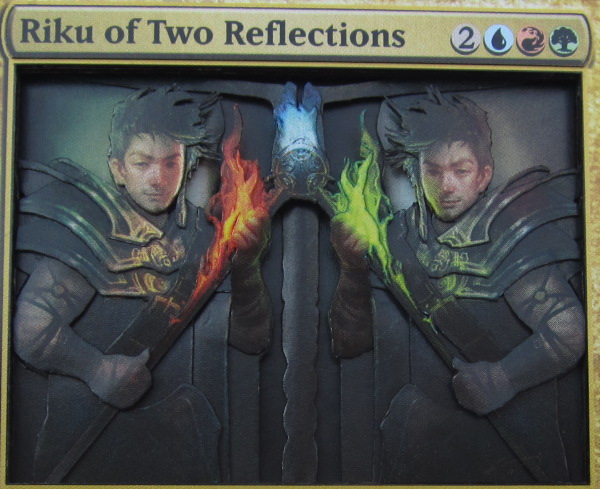
I have wanted to make a 3D Riku of Two Reflections ever since I saw the artwork spoiled. Izzy did a great job, and I think it’s brilliant that the two reflections of Riku are actually identical except for the coloration (as shown in this Arcana).
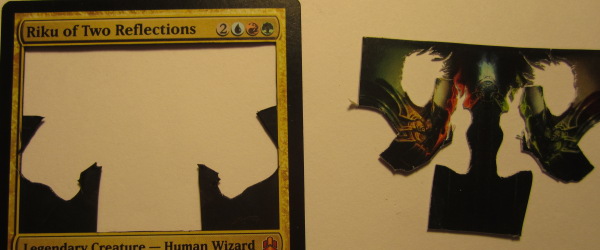
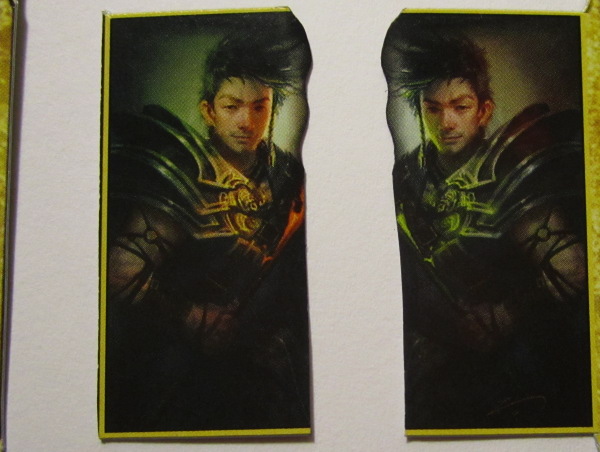
Sadly, some of the details are lost on the card because it’s so much darker than the original artwork. Once again, I track down the artwork to use as a reference to guide my cuts.
Like many of the Legendary creatures I’ve worked on recently, Riku has a lot of overlapping details. Ideally, overlapping details look like those on Kaervek the Merciless, where all of the overlapping goes in the same direction:
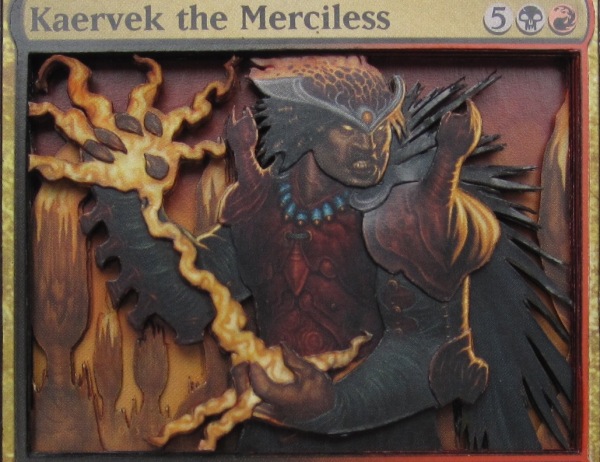
Kaervek’s head overlaps his cape, which in turn overlaps his shoulder pad, which overlaps his arm, and so on down the line. The flames weaving through his fingers add a bit of complication, but overall it was easy to construct.
The overlapping details in Riku’s art are not so straightforward. His art has an example of a particularly difficult feature to detail: what I call the “triple-overlap.” A triple-overlap happens when you have three pieces, each of which is on top of one of the others and below the other.
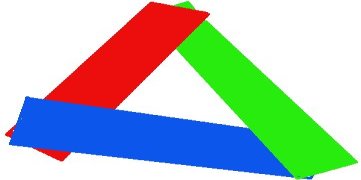
It’s a triangle . . . of total devastation!!
Only a handful of the cards I’ve worked on have had sections that looked like this. The Teferi, Mage of Zhalfir and Brion Stoutarm that I showed in previous articles both had such sections.
The section on Teferi is made of four pieces—his body, sleeve, arm, and staff—but I still call it a triangle.
Each copy of Riku has two such overlapping sections in close proximity, for a total of four on the entire card. Check out Riku’s art and see if you can figure out what elements of the art form the triangles.
Here’s what I see:
Staff – Body – Sleeve – Raised Arm
Shoulder Pads – Lowered Arm – Chest Belt
The first triangle is formed by four pieces, just like on Teferi.
Knowing I have those difficult sections to work on later, I start out with some simpler cuts. Building Riku starts with cutting two layers. The first layer I cut eliminates everything in the background:
The next layer I make is this one:

I later clean up the blue flame in that layer, trimming it down to only the brighter blue and having the dark blue be a background glow.
My plan is to build the rest of Riku around those two layers. The rest of the details of his body will be made of small pieces. I cut a bunch of those small pieces next:
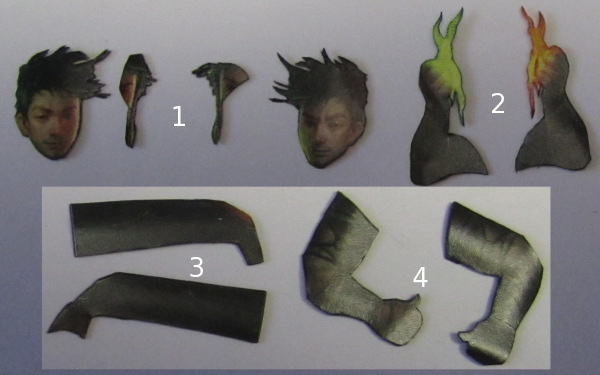
(1) Here are the pieces I cut for Riku’s heads. The smaller pieces in the middle will only have a small part showing—a few tufts of hair and the braid from each.
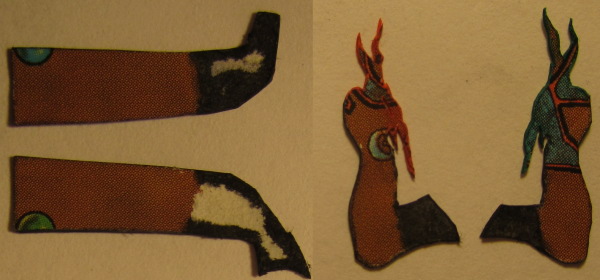
(2) The pointed end of each of Riku’s arms will tuck under his sleeve, while the hand and part of the flame will wrap over the staff to join the rest of the flames.
(3) These pieces will be Riku’s sleeves. The higher side of each will tuck behind his bodies and the pointed end will tuck behind the upper arms (2).
(4) Riku’s lower arms are the only part of that triple-overlap I cut at this point.
As I mentioned in my previous article, I’ve been working more on shaping individual pieces to give them more depth. In that picture, it’s most noticeable on Riku’s lower arms (4), but his head and upper arms have also been rounded and bent to add to the 3D effect.
To construct the first triangle, I cut a hole in my primary Riku layer to slide the sleeves through:
In this rear view, you can see that in addition to cutting the hole, I shaved away some of the back of the card near the hole to make it thinner, then recolored the edge with a dark gray. Whenever you have lots of pieces to cram into a limited space, it can help to make them smaller or thinner. Most of the detail pieces will have their backs partially or fully shaved off, just like the sleeves and arms here:
I attach the sleeves and arms, planning to tuck the staff layer in behind the flaming hands later:
Since inserting the sleeve required me to cut through Riku’s skirt (or whatever his clothing looks like below the waist—to me it looks like a fur skirt), I need to have an uncut skirt to cover that line. My first attempt at cutting it looks like this:

It’s clear from a quick glance that those two skirts are not even close to identical. I’m usually pretty confident with the cuts I make, but in such dark and ill-defined areas, it’s hard to be precise. I discard this attempt, and for my replacement layer, I line it up with the main Riku layer and scratch a trace line to guide me. I make sure not to let my first attempt go to waste, using it for the info and text boxes in the top layers.
Next, I cut the rest of the detail pieces for Riku: his shoulder armor and chest belt.
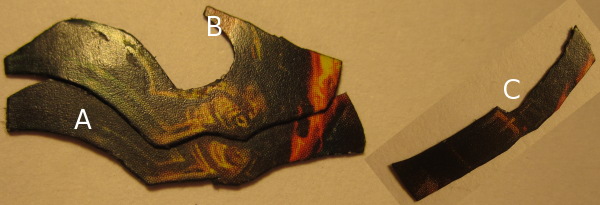
(A) Here are two of the three pieces that make up the armor; the third is so flimsy that I decide to attach it only after the rest of this triple-overlap is constructed.
(B) This tab will tuck behind Riku’s neck to enhance the perception that his interior shoulder is more distant.
(C) Riku’s belt, along with both of the pieces from (A), has the back completely shaved off.
Of course, after I’ve assembled the first armor/belt/arm triangle, I have to start over, cutting the same pieces for the other reflection of Riku.
The final piece of Riku I make is his cape. It has a very small visible area, so I can cut a layer for it from a copy of Riku I previously used for multiple detail pieces:
I attach the cape layer to the back of Riku, add the skirt and staff layers, and end up with this:
With Riku’s reflections complete, I move on to the background. The art description suggests it might be a mirror, but I’ve heard people refer to the background as doors or portals as well. I decide to leave it a bit ambiguous, but add some depth to it. I start by cutting the T-shaped frame:
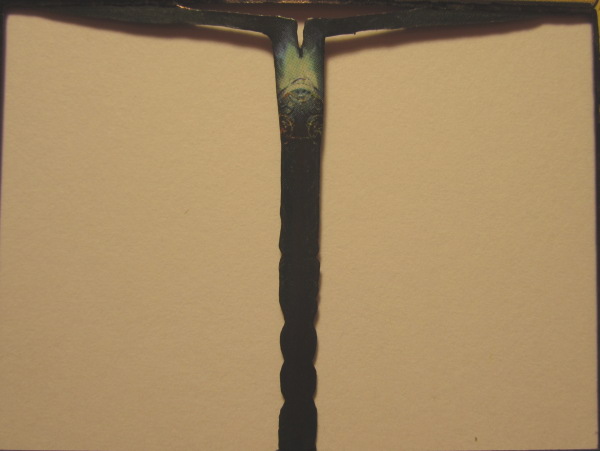
As with other pieces, I use my shaping tools to give it some roundness. I also round the inner edge of the pieces I cut for the light-gray part of the background:
That could have been one piece, but since I was cutting fuzzy lines again, I cut one side free so I could scratch a trace line on the other side.
Finally, since only a bit of the art is visible in the far background, I use another pillaged scrap to make the furthest-back layer:
On cards with as many detail layers as Riku, it’s important to find ways to use as many scraps as you can, or you’ll wind up using a lot more cards than necessary. This 3D Riku was made using seven copies.
The finished stack is like this:
| Bottom Layer: | Random common |
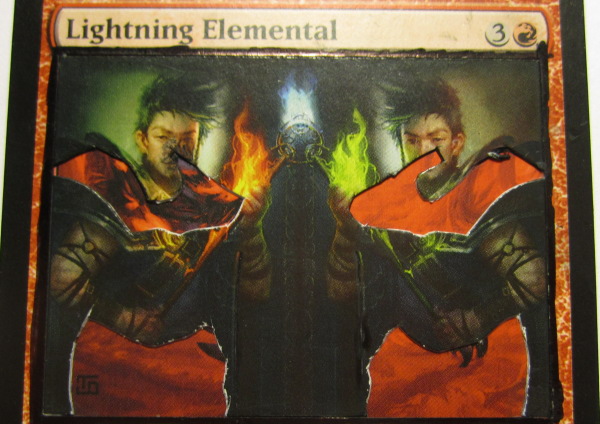
| Layer 2: | Spacer 1 (Lightning Elemental with Riku art) |
| Layer 3: | Spacer 2 |
| Layer 4: | Riku: Curved mirrors/doors |
| Layer 5: | Riku: T-frame |
| Layer 6: | Spacer 3 |
| Layer 7: | Riku: Cape only |
| Layer 8: | Riku’s main layer |
| Layer 9: | Riku’s skirt and lots of detail pieces |
| Layer 10: | Spacer 5 |
| Layer 11: | Riku’s Staves |
| Layer 12: | Spacer 6 with Riku’s text box |
| Layer 13: | Riku: Art and text box removed |
| Layer 14: | Info boxes and black border raised |
So that’s what I’ve been working on recently—what about you? If you’ve made any 3D cards and want to show them off or get some feedback, head over to the artwork section of the forums and show them to the world!
Drew Sitte
AlteredCity at gmail dot com
@AlteredCity on Twitter