


When I looked at every legendary creature in Commander Legends, a couple jumped right out at me. But none so much as this guy:

I love a good Rakdos commander, especially one that wants us to hurt ourselves. I also like figuring out how to win games of commander in unusual ways, and this guy begs for that. Let's unpack him a bit, shall we?
"Whenever you sacrifice a permanent..." Okay, we're not limited to just creatures. We can sacrifice whatever we want... or can.
"...put a +1/+1 counter on Juri, Master of the Revue." So, for our trouble of dumping our own stuff in the 'yard, we get a slight power and toughness boost on our commander. It's a permanent boost, but still, seems like not much of a payoff.
"When Juri dies, it deals damage equal to its power to any target." A ha! Now we're talking. We get a 1/1 commander for two mana that throws its power's worth of damage straight to the dome.
Unfortunately, it's not commander damage, because that has to be combat damage and this isn't, but still. We don't have to deal with blockers, all we have to do is kill our dude somehow. And get him big enough he does enough damage to matter.
Here's what I came up with.
Juri, Master of the Revue | Commander | Mark Wischkaemper
- Commander (1)
- 1 Juri, Master of the Revue
- Creatures (27)
- 1 Beetleback Chief
- 1 Blight Herder
- 1 Chittering Witch
- 1 Dockside Extortionist
- 1 Emrakul's Hatcher
- 1 Endrek Sahr, Master Breeder
- 1 Geralf's Messenger
- 1 Ghoulcaller Gisa
- 1 Goblin Rabblemaster
- 1 Keldon Overseer
- 1 Legion Warboss
- 1 Marsh Flitter
- 1 Mayhem Devil
- 1 Murderous Redcap
- 1 Myr Battlesphere
- 1 Pawn of Ulamog
- 1 Pia and Kiran Nalaar
- 1 Pitiless Plunderer
- 1 Puppeteer Clique
- 1 Rapacious Dragon
- 1 Ruthless Knave
- 1 Scampering Scorcher
- 1 Sengir Autocrat
- 1 Siege-Gang Commander
- 1 Sifter of Skulls
- 1 Sling-Gang Lieutenant
- 1 Viscera Seer
- Instants (2)
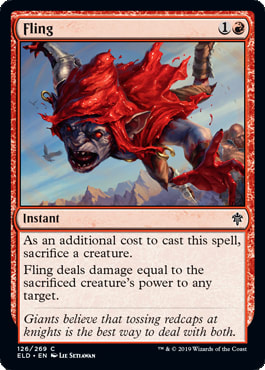
- 1 Fling
- 1 Kazuul's Fury
- Sorceries (15)
- 1 Act of Treason
- 1 Brass's Bounty
- 1 Contract Killing
- 1 Corpsehatch
- 1 Goatnap
- 1 Harness by Force
- 1 Kari Zev's Expertise
- 1 Mark of Mutiny
- 1 Pirate's Pillage
- 1 Rite of Consumption
- 1 Seize the Spoils
- 1 Shackles of Treachery
- 1 Skittering Invasion
- 1 Threaten
- 1 Wrangle
- Enchantments (8)
- 1 Attrition
- 1 Dictate of Erebos
- 1 Dictate of the Twin Gods
- 1 Furnace of Rath
- 1 Goblin Assault
- 1 Goblin Bombardment
- 1 Gratuitous Violence
- 1 Grave Pact
- Artifacts (9)
- 1 Ashnod's Altar
- 1 Claws of Gix
- 1 Mimic Vat
- 1 Nim Deathmantle
- 1 Phyrexian Altar
- 1 Skullclamp
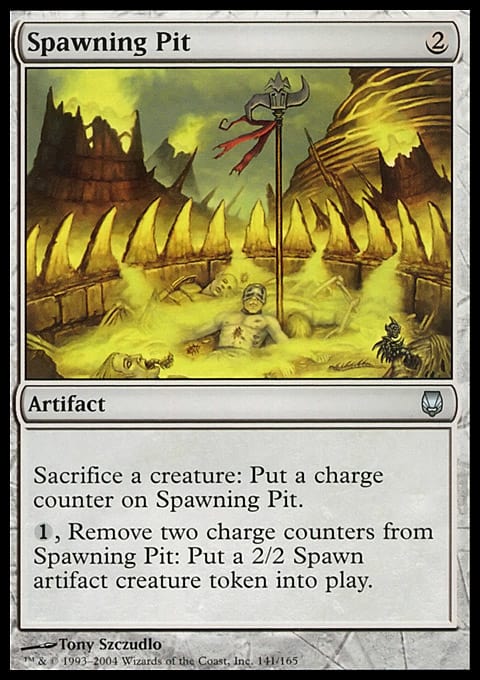
- 1 Spawning Pit
- 1 Trading Post
- 1 Tamiyo's Journal
- Lands (38)
- 1 Mountain
- 1 Swamp
- 1 Akoum Refuge
- 1 Arcane Lighthouse
- 1 Auntie's Hovel
- 1 Blackcleave Cliffs
- 1 Blighted Fen
- 1 Blighted Gorge
- 1 Bloodfell Caves
- 1 Bloodstained Mire
- 1 Bog Wreckage
- 1 Buried Ruin
- 1 Castle Locthwain
- 1 Cave of Temptation
- 1 Cradle of the Accursed
- 1 Dragonskull Summit
- 1 Dunes of the Dead
- 1 Dwarven Ruins
- 1 Ebon Stronghold
- 1 Emergence Zone
- 1 Endless Sands
- 1 Evolving Wilds
- 1 Foreboding Ruins
- 1 Grasping Dunes
- 1 Graven Cairns
- 1 High Market
- 1 Homeward Path
- 1 Ifnir Deadlands
- 1 Luxury Suite
- 1 Ravaged Highlands
- 1 Rocky Tar Pit
- 1 Scavenger Grounds
- 1 Smoldering Marsh
- 1 Smoldering Spires
- 1 Spawning Bed
- 1 Temple of Malice
- 1 Terramorphic Expanse
- 1 Witch's Cottage
Let's start with things to sacrifice. The first thing to look at is stuff that can sacrifice itself. Treasures and Clues both come to mind. Clues are great since they draw us cards, but alas, they're mostly in Blue; the only way to get them in our color combination is Tamiyo's Journal, which was in the deck to nearly the end but ultimately got cut. Treasure tokens, on the other hand, are plentiful, cheap, and make mana for us, so we've got a bunch of ways to make them. Keep your eyes on the triggers; sometimes they happen when a card enters the battlefield, but other times when things die or other events occur. We want them all and we want to sacrifice them a lot.
The other thing we can do is make creature tokens. We'll need ways to sacrifice them, but we can solve that problem. In the meantime, we can make Goblins, Serfs, Eldrazi Scions and Spawns (which can sacrifice themselves!), Zombies, Elementals, Myr, Thrulls, Rats, and Thopters. We want to spit them out starting as soon as possible. Ideally, we clutter up the battlefield, use them to chump block, and keep enough damage off our backs to keep jamming counters on Juri.
To sacrifice them, the biggest hope is the following text: "Sacrifice a creature:". Note there's no mana and no tap symbol. If it costs mana, it's okay, and if there's a tap symbol, it's okay, but really we want something like Spawning Pit or Viscera Seer so we can just pick up a pile of tokens and sacrifice them all at once. The best one is probably Goblin Bombardment, because we get to do damage for each thing we sac too! We have some that do cost mana as well, though. Ghoulcaller Gisa does us the favor of giving us Zombies in exchange for our sacrifice, and Ruthless Knave drops some Treasure on us. We have around ten sacrifice outlets, and I wouldn't cut a single one. We really need one to make our deck work. Note that Claws of Gix lets us sacrifice any permanent, so we can use that in a final big push to win the game.
There is one other permanent type that likes to sacrifice itself, though: Lands. There are a ton of lands which sacrifice themselves for some effect. We've got a bunch of them. It's worth noting this is a time to keep the Bloodstained Mire for turn three, so we can play out Juri first and get the counter for the sacrifice! The mana base here may need a bit of work; there are a lot of lands which sacrifice themselves, and as such we only have two basics. There should be enough targets for the fetches, but we might actually have to sacrifice a land and fail to find, which always feels silly. However, having 20 lands that sacrifice themselves adds up to a lot of extra damage we can do.
The other thing Red is so good at is temporarily stealing opponents' stuff. This works great for us, because we have all these ways to sacrifice things, which both helps Juri and gets rid of problematic creatures our opponents are so fond of playing. We have a few ways to do this, and it makes up the majority of our removal package. There's nothing quite like the look on an opponent's face when you Goatnap their Blightsteel Colossus, kill someone else with it, then sacrifice it to Phyrexian Altar for a single mana, plus put a counter on Juri. Good times.
It might be worth considering Mob Rule and Insurrection; both cards are absurd with plenty of sacrifice effects and win games, but I couldn't figure out how to get them in!
We have a couple more ways of killing creatures. Attrition is great in any token deck that can run it, and Corpsehatch and Contract Killing both leave us with things that sacrifice themselves, so they're worth the slots. Finally, we have Grave Pact and Dictate of Erebos as well. If you're unfamiliar with these enchantments, be glad, because they are not at all fun to see on the other side of the table. However, when we're likely sacrificing two or three creatures every turn, those guys do a good job of keeping the rest of the board clear so no one tries to kill us.
 | 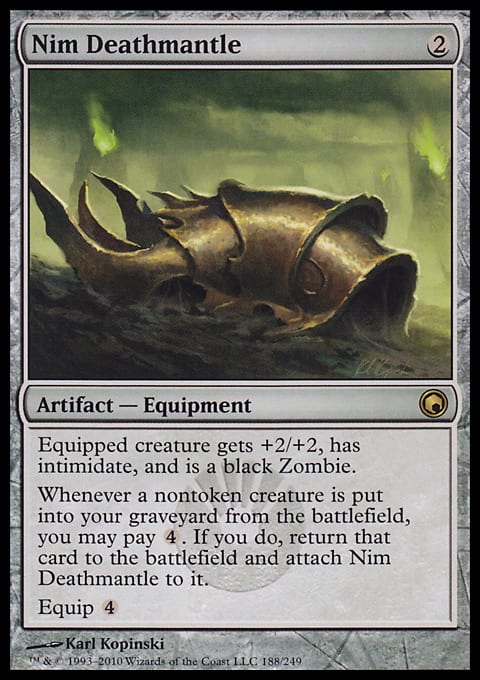 |
Finally, I snuck in one of my favorite pocket combos, just because it made so much sense in this shell. The general combo is this: Ashnod's Altar + Nim Deathmantle + any creature that comes back from the dead on its own once (Geralf's Messenger, normally). You sacrifice the Messenger to the Altar, netting ![]() , then when it returns, you sac it again, netting another
, then when it returns, you sac it again, netting another ![]() . You then spend your
. You then spend your ![]() to activate Nim Deathmantle and return the Messenger, and the whole thing starts over again. This kills the table all by itself, but each piece of the combo is great in the deck, so it made sense to include it. The thing is, we can actually expand on it with the inclusion of Red! Persist works just as well as Undying in this combo, so Murderous Redcap works the same as the Messenger once the combo gets rolling. Interestingly, so does Puppeteer Clique, which won't kill the table on its own but can be sacrificed infinite times using the combo to make Juri arbitrarily large. It also means we can steal the entire board's worth of creatures, which might be enough to end the game anyway, and certainly will be a board wipe.
to activate Nim Deathmantle and return the Messenger, and the whole thing starts over again. This kills the table all by itself, but each piece of the combo is great in the deck, so it made sense to include it. The thing is, we can actually expand on it with the inclusion of Red! Persist works just as well as Undying in this combo, so Murderous Redcap works the same as the Messenger once the combo gets rolling. Interestingly, so does Puppeteer Clique, which won't kill the table on its own but can be sacrificed infinite times using the combo to make Juri arbitrarily large. It also means we can steal the entire board's worth of creatures, which might be enough to end the game anyway, and certainly will be a board wipe.
The other thing is we don't have to use Ashnod's Altar. Phyrexian Altar works the same way in this deck with the right creature: we need one which makes four bodies. So, Siege-Gang Commander can be sacrificed, along with its Goblins, to Phyrexian Altar for four mana, which is enough to activate the Deathmantle. Sengir Autocrat works too, and Emrakul's Hatcher. With Pitiless Plunderer out, we get Treasures whenever something dies, so any two bodies will do it. Pawn of Ulamog works the same way, just with Spawns instead of Treasure. The only non-replaceable part of the combo is the Deathmantle. And we have no way of searching for any of the pieces! The point is to win with Juri. If we luck into the combo, so be it.
One cool thing about this deck is how active it'll be. You'll be busy each turn, but you won't have to spend 20 minutes in the tank trying to figure it out, so it should be fun to play and to play against.
I'd love to hear how you'd build this deck. Did I miss something completely obvious? Does it absolutely need more Fling effects? Would it be better with infinite token combos? Let me know in the comments! While we're at it, why don't you tell us your favorite uncommon commander?
Now get out there and blow up your own board!
Thanks for reading, and stay safe.