When I was going through high school, I was the definition of a metalhead goth kid. I was all about wearing black, indulging in the dark vibes of life.
In Strixhaven, Magic: the Gathering's school of magic, this is exactly the type of person you might expect to find in Witherbloom. The Witherbloom college is all about people enamored by the cycle and harmony in life and death. In fact, Wizards themselves frequently referred to them as the sort of punk goth kids of Arcavios during their marketing push of the latest visit to Strixhaven: Secrets of Strixhaven.
In the original Strixhaven: School of Mages, the Witherbloom were all about gaining life and generally did so through the sacrifice of Creatures. Each of the Pest tokens you made could be sacrificed for life as well as other fun value plays. This time around, things might be a little bit different.
Witherbloom Pestilence
In Secrets of Strixhaven, the Witherbloom are once again all about generating value by gaining life, though they do so via different means than before. Your Pest tokens attack to gain life. While you're still going to be sacrificing them here and there, it's not quite the same.
That is unless you're playing with the new Witherbloom Pestilence deck, of course.
 |  |
Dina, the Witherbloom Dryad who was a star student in the first set, is back once again. Her original card, Dina, Soul Steeper, was all about gaining life and sacrificing Creatures all on a single card.
This time, she's back as Dina, Essence Brewer and she's all-in on the sacrificing side of Witherbloom this time around. As you sacrifice Creatures, you'll slowly accumulate card advantage from Dina's first ability. While it only triggers once per turn, you can get around this by sacrificing stuff on each of your opponents' turns as well.
Best of all, though, is that if you use her to sacrifice stuff, Dina will also gain you some life and super charge your other Creatures. If you put the counters onto a Creature and then sacrifice it, you'll get to put even more counters on the next one. The deeper you go, the bigger your Creature will get.
Let's check out the decklist and see what we're working with.
Witherbloom Pestilence | Commander | Wizards of the Coast
- Commander (1)
- 1 Dina, Essence Brewer
- Creatures (39)
- 1 Beledros Witherbloom
- 1 Blood Artist
- 1 Bloodghast
- 1 Blossoming Bogbeast
- 1 Creakwood Liege
- 1 Defiling Daemogoth
- 1 Dina, Soul Steeper
- 1 Eccentric Pestfinder
- 1 Elvish Mystic
- 1 Gilded Goose
- 1 Gorma, the Gullet
- 1 Gyome, Master Chef
- 1 Haywire Mite
- 1 Jadar, Ghoulcaller of Nephalia
- 1 Mazirek, Kraul Death Priest
- 1 Merchant of Venom
- 1 Morbid Opportunist
- 1 Mycoloth
- 1 Nether Traitor
- 1 Ohran Frostfang
- 1 Ophiomancer
- 1 Pawn of Ulamog
- 1 Pest Rescuer
- 1 Priest of Forgotten Gods
- 1 Ribtruss Roaster
- 1 Sakura-Tribe Elder
- 1 Smothering Abomination
- 1 Springbloom Druid
- 1 Stensian Sanguinist
- 1 Teacher's Pest
- 1 Tendershoot Dryad
- 1 Umbral Collar Zealot
- 1 Veinwitch Coven
- 1 Viscera Seer
- 1 Wight of the Reliquary
- 1 Witch of the Moors
- 1 Woe Strider
- 1 Yahenni, Undying Partisan
- 1 Zulaport Cutthroat
- Instants (5)
- 1 Assassin's Trophy
- 1 Infernal Grasp
- 1 Mortality Spear
- 1 Plumb the Forbidden
- 1 Witherbloom Charm
- Sorceries (11)
- 1 Casualties of War
- 1 Culling Ritual
- 1 Cultivate
- 1 Deadly Brew
- 1 Final Act
- 1 Immoral Bargain
- 1 Night's Whisper
- 1 Ominous Harvest
- 1 Pest Infestation
- 1 Toxic Deluge
- 1 Witherbloom Command
- Enchantments (5)
- 1 Awakening Zone
- 1 Blight Mound
- 1 Feral Appetite
- 1 Moldervine Reclamation
- 1 Trudge Garden
- Artifacts (2)
- 1 Arcane Signet
- 1 Sol Ring
- Lands (37)
- 8 Forest
- 8 Swamp
- 1 Bojuka Bog
- 1 Command Tower
- 1 Exotic Orchard
- 1 Fabled Passage
- 1 Festering Thicket
- 1 Grim Backwoods
- 1 Haunted Mire
- 1 High Market
- 1 Llanowar Wastes
- 1 Necroblossom Snarl
- 1 Path of Ancestry
- 1 Study Hall
- 1 Temple of Malady
- 1 Terramorphic Expanse
- 1 Titan's Grave
- 1 Turbulent Fen
- 1 Twilight Mire
- 1 Vernal Fen
- 1 Viridescent Bog
- 1 Witherbloom Campus
- 1 Woodland Cemetery
Examining the Decklist
One look through this list really drives home exactly what the core concept of this deck is: sacrifice. Cards like Merchant of Venom, Smothering Abomination, and Mazirek, Kraul Death Priest all drive this home. The more you sacrifice, the more value you can generate from each of these powerful Creature cards.
 |  |  |
You can also see this in a lot of the deck's main synergies. You get cards like Umbral Collar Zealot and Viscera Seer to sacrifice stuff with and then get the requisite copies of Blood Artist and Zulaport Cutthroat as payoffs. You even have a solid number of different options to continually produce sacrifice fodder as you do to ensure you can keep the ball rolling.
While it's clear this is the main theme of the deck, there are still a few life gain payoffs as well. Both Pest Rescuer and Eccentric Pestfinder encourage you to gain life. When you do they provide you with more Pest tokens to sacrifice for more value. Similarly, Veinwitch Coven outright buys back any Creature when you gain life, giving you a great way to replay high value Creatures once again.
If you go deep on Dina, Essence Brewer's sacrificing, you can also end up gaining tons of life as you make your Creatures bigger. This provides a huge payoff alongside cards like Blossoming Bogbeast and Defiling Daemogoth. While Witherbloom Pestilence's strategy is still sacrificing Creatures, cards like these strongly encourage you to do so with Dina in order to maximize the deck's biggest plays.
Upgrading the Deck
Maintaining a Steady Stream of Creatures
The first thing most typically explore when working on a deck with a heavy sacrifice theme is to find ways to have plenty of Creatures at their disposal. After all, the core concept behind the deck is to sacrifice Creatures. How are you going to do that if you don't have Creatures to sacrifice?
Typically, I'd start by looking at a specific type of Creature: ones that routinely come back on their own. These are Creatures by which you can use an ability somewhere on the card to bring themselves back from the graveyard.
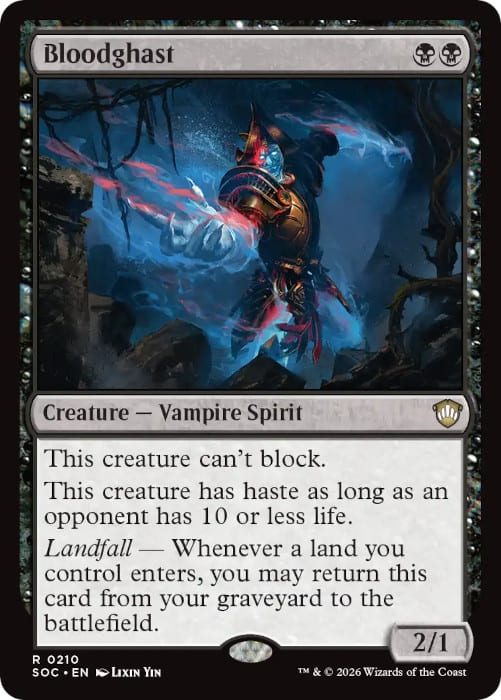 | 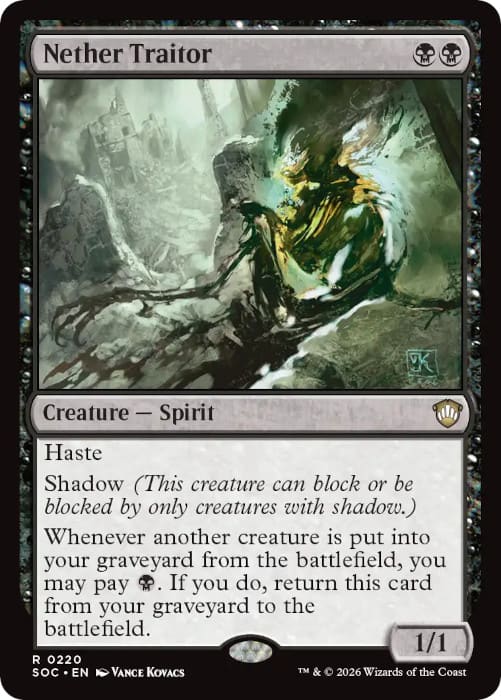 |
Surprisingly, the deck already has a couple of fairly heavy hitters in it for this category. Bloodghast and Nether Traitor have always been two of the first cards I bring up with decks like this and instead, they're just automatically included in the precon. Both of them come back from your graveyard with ease by performing simple game actions like playing a Land or having another Creature die.
There are still a few other good options you can pull from, though.
Two of my favorites are Bloodsoaked Champion and Razorlash Transmogrant. Each of these is extremely easy to get back on the battlefield. In the case of Bloodsoaked Champion, all you need to do is attack once, which is usually trivial in a game of Commander. The Razorlash Transmogrant also benefits strongly from Commander, since the format is more prone to relying heavily on nonbasic Lands.
 |  |  |
In a pinch, there are a number of fairly budget friendly options as well. Just about everyone has a copy of Reassembling Skeleton or Sanitarium Skeleton in their collections. You even have a new option in Project Deathlok Soldier from Marvel Super Heroes if you're really hurting for an extremely accessible option to pull from.
Each of these cards comes back for a very small cost. Reassembling Skeleton comes back to the battlefield directly. If you want to try taking advantage of discarding in addition to sacrificing, you can use the other two cards to get Creatures into your hand too. This is especially great if you add something like Tortured Existence to your deck
 |  |  |
The other side to this isn't just pulling Creatures back out of your graveyard repeatedly, but finding ways to generate lots of sacrifice fodder. Typically, this means having a source that generates tokens every turn.
Once again, the precon offers some of the best options around for this. Cards like Ophiomancer and Jadar, Ghoulcaller of Nephalia are famous for being excellent at this. Ophiomancer is especially great, as it gives you a new token every turn provided you're able to sacrifice your existing one each turn. Tendershoot Dryad acts similarly, assuming you have the City's Blessing active.
Mycoloth is another great piece for this, giving you lots of Saproling tokens depending on how many Creatures you sacrificed to it up front. If you combine it with Pawn of Ulamog and some of your recursive Creatures (Bloodghast and friends), you can generate a fairly steady stream of tokens.
 | 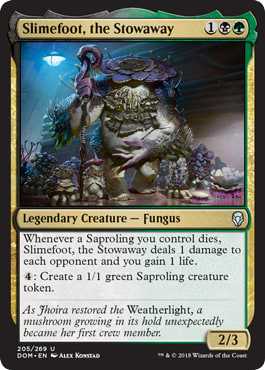 |  |
You can also go a bit old school and break out cards like Verdant Force and Sprout Swarm. Verdant Force is another option that makes a token each turn while Sprout Swarm can let you go as deep as you have mana and Creatures to do so. You can also break out some other repeatable token generators like Slimefoot, the Stowaway and Jade Mage to create Saprolings with your excess mana each turn.
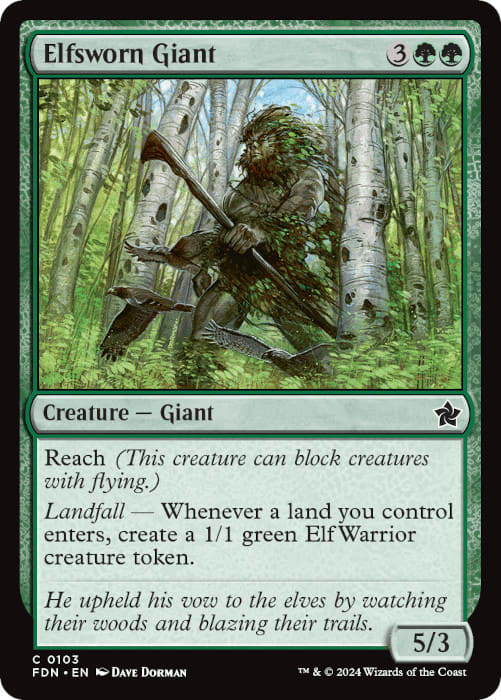
There're even some solid options available to you that utilize Landfall to produce tokens. These include Sporemound, Rampaging Baloths, and Elfsworn Giant. Each one makes a token by performing a simple game action: playing Lands. There's naturally going to be a finite amount of tokens you can make this way, but it's consistent enough that you'll make plenty of critters to help close out a game.
Are There Better Sacrifice Outlets?
Now that we've taken a look at ensuring we have plenty of Creatures to sacrifice, what about ways to do the sacrificing? Naturally, sacrificing stuff is what you want to do most here. As such, you need to find the best methods to send your Creatures straight to the graveyard.
Naturally, the best sacrifice outlets are the ones you can activate for free. These are the ideal option since they let you make use of them over and over again for as long as you have Creatures to sacrifice.
 |  |  |
Some of the best options are on a variety of Artifacts and Enchantments. Ashnod's Altar and Phyrexian Altar are two especially famous ones, offering you mana in exchange for a sacrifice. These can be rather costly to pick up, but are worth it if you want to get the most out of your deck. Alternatively, cards like Greater Good and Altar of Dementia provide strong value engines of their own while granting you a free sacrifice outlet in the process.
One that especially stood out while going through cards was Life Chisel. This Legends Uncommon is surprisingly cheap and gives you a way to sacrifice your Creatures while also gaining you life for your handful of cards that care about it. Since it's a card from the game's early days with only one printing, it can be tough to track down a copy. If you can find one, though, they usually only go for a few dollars, which makes for an excellent inclusion that's guaranteed to be a reader.
Dissection Tools is another (likely more accessible) option for you to sacrifice Creatures and gain life. Unlike the other options mentioned here, Dissection Tools doesn't grant you any bonuses for your sacrifice aside from equipping onto a Creature. However, you can re-equip to the same Creature multiple times, and the power boosts are nothing to scoff at.
 |  |  |
There are also some decent Creatures that offer solid options for sacrifice outlets as well.
The best of these is almost certainly Carrion Feeder. It's a classic of sacrifice strategies thanks to the way it can continuously grow over a number of turns. This pairs especially well with Dina, as it can grow in multiple ways before giving a huge boost to another Creature. You can do similar things with cards like Bloodthrone Vampire and Nantuko Husk, though the boosts are far less permanent in those cases.
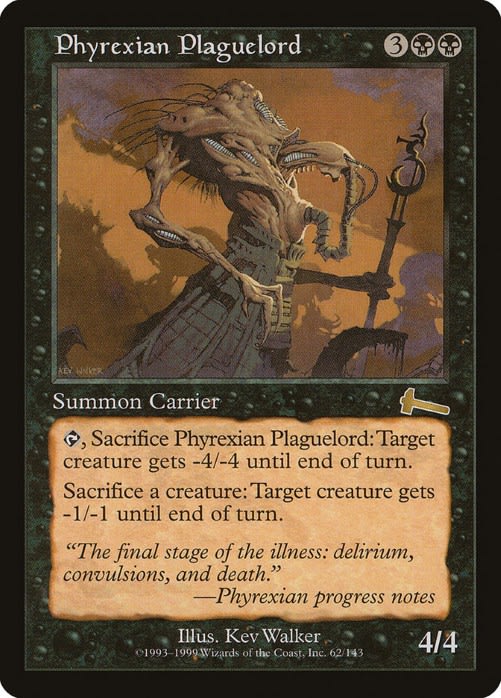
If you're not so interested in making your Creatures stronger, what about making your opponents' Creatures smaller instead? That's what makes Phyrexian Plaguelord so fun. Not only do you get to sacrifice your own stuff at a rapid fire rate to deal with your opponents' stuff, but you can have it sacrifice itself to take down a particularly nasty threat.
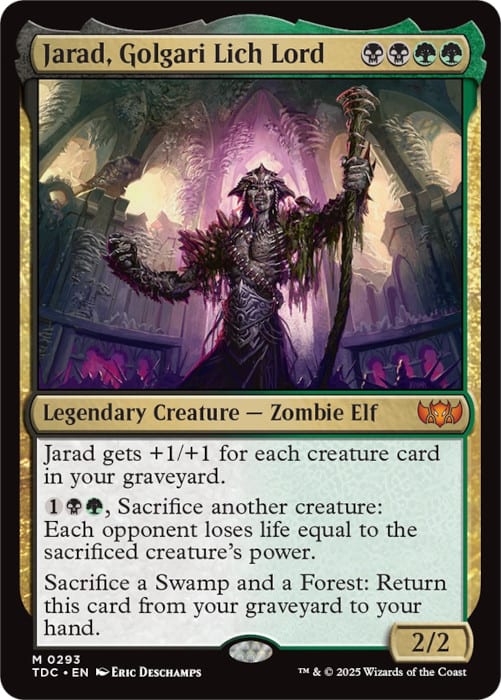
Each of the other options mentioned here don't cost any mana to activate their sacrifice abilities. However, it's definitely worth shouting out Jarad, Golgari Lich Lord even if he requires you to put in some mana to utilize him effectively. His ability is awesome because it provides you another powerful means of turning the Creatures you make huge with Dina into effective kill conditions against your opponents. Just imagine going all in on a Bloodthrone Vampire and then sacrificing it to this!
Finding The Best Sacrifice Payoffs
The last angle we need to check out is the cards that provide a payoff for sacrificing your stuff. Thankfully, there are already some pretty great ones in here right out of the box.
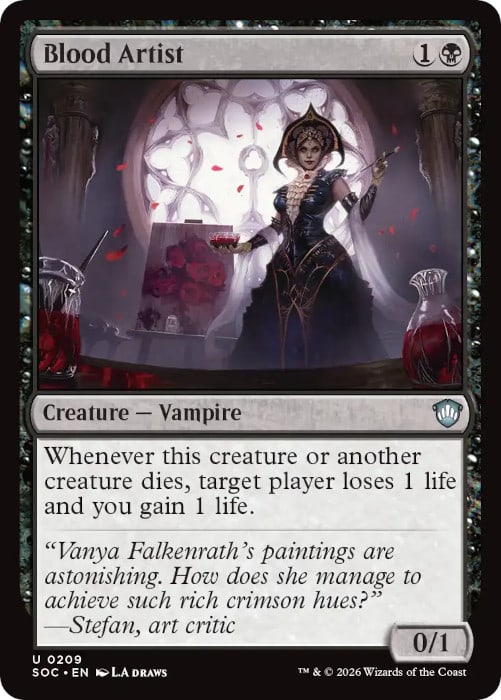 |  |
Both Blood Artist and Zulaport Cutthroat are some of the best finishing cards in Commander. Each lets you slowly drain your opponents' life as Creatures are picked off. This could be either sacrificing or just letting them die the old-fashioned way.
There are slight differences between the two, however. Blood Artist triggers off of any Creature dying, but only drains a single player's life. Zulaport Cutthroat on the other hand only triggers when your Creatures die. In this case, it will hit all of your opponents. Since you're the one trying to do the sacrificing as opposed to killing your opponents' Creatures, you should lean more towards what Zulaport Cutthroat is doing.
 |  |  |
Only a few Creature cards offer this version of the ability. Typically, you'll see cards like Vengeful Vampire, Falkenrath Noble, and even the powerful Sephiroth, Fabled SOLDIER // Sephiroth, One-Winged Angel all have the Blood Artist version. They're not bad, but you really want something that hits everyone.
Two easy options for this are Vindictive Vampire and Venerated Stormsinger. Both offer the ability to hit every opponent on a bigger body, but at a higher cost. If you have to choose one of these, Venerated Stormsinger offers more by being a bigger body and making a token on its own when it attacks. Poison-Tip Archer works well also, but you won't gain life with that card.
The most on-theme Creature here, though, is easily South Wind Avatar. Not only does it give you a unique take on Zulaport Cutthroat's ability, but it plays into the deck's sub-theme of gaining life. That alone can lead to some massive swings in your game.
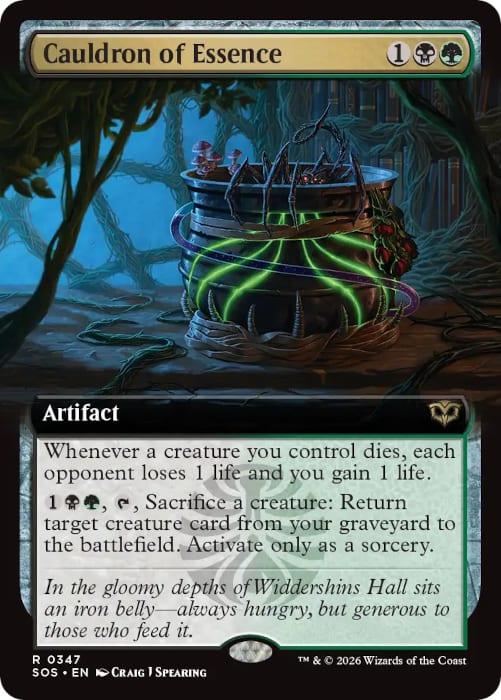
Alternatively, there are several Enchantments with the effect as well. Bastion of Remembrance is the classic among these, creating a Creature but providing a more effective way of dishing out damage in the long term. You can get some fairly similar effects from Cauldron of Essence and Funeral Room // Awkenening Hall while simultaneously having the ability to return Creatures from your graveyard to the battlefield. It's hard to beat that kind of value.
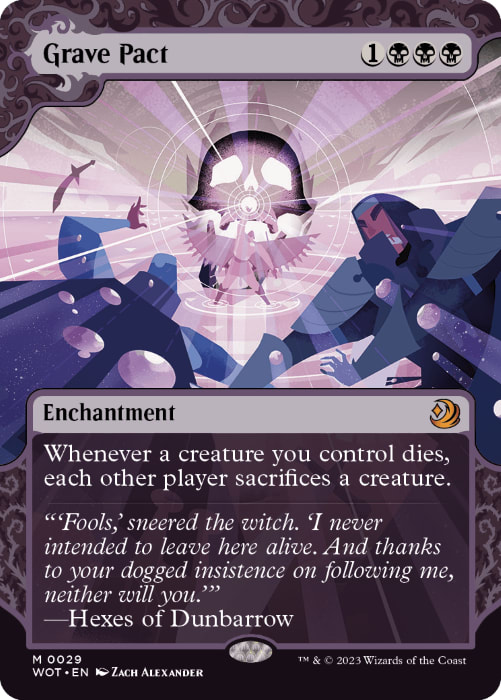 | 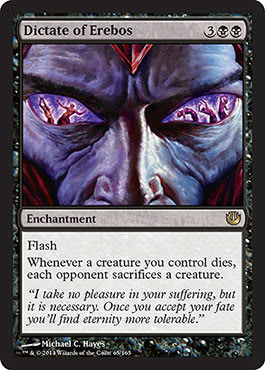 |
If you want a really potent experience, though, adding copies of both Grave Pact and Dictate of Erebos will let you completely dominate a game. Every time you sacrifice a Creature, your opponents will need to do the same. If you can keep it up, you'll gain full control of the board, clearing your way to victory.
It's important to keep in mind, though, that these cards can be really intense. As a result, they can be very salt-inducing among your local playgroup. Be ready to remove one or both from your list if your group isn't up to the experience.
Is Witherbloom, the Balancer Worth Adding?
Throughout this Commander upgrade series for Secrets of Strixhaven, the question always comes up: is it worth adding the deck's new Elder Dragon into the deck? Thus far, it's been a mixed bag. Some decks can make great use of their new Legendary Dragon while others struggle, with the Creature's ability at odds with the deck's main theme.
 |
So now we come to Witherbloom, the Balancer and ask the question one last time: is it worth adding this card into the deck?
Much like some of the other decks in this round of precons, the ability that Witherbloom provides is a good one that can work solidly with the deck. Much like Lorehold, the Historian, she runs into a simple problem of not having a ton of great cards to pair well with her.
What I mean by this is that most of the Instant and Sorcery spells in your deck only have one or two generic mana that you can shave off. In fact, only Final Act and Pest Infestation allow you to really go deep in your cost reductions.
Despite this, even shaving one or two mana off spells can be huge the deeper you get into a game. Not only that, but if you have enough Creatures on your side of the board, Witherbloom is still a massive Dragon that you can put into play for only ![]()
![]() . That means Witherbloom, the Balancer is likely to be a solid card no matter what, but not a must-play inclusion.
. That means Witherbloom, the Balancer is likely to be a solid card no matter what, but not a must-play inclusion.
 |
That said, if you do add in a copy of Witherbloom into the deck, you should definitely try sourcing a copy of Sprout Swarm. The card is an easy infinite combo with Witherbloom, giving you both a massive board and an endless supply of sacrifice fodder.
Conclusion
Witherbloom Pestilence offers a really fun take on the Creature sacrifice - or Aristocrats - theme that's become a fan favorite among Commander players. It can be a bit difficult to pick up and understand if you're a newer player who doesn't like having your stuff die. The more you play with the deck, though, the more rewarding your experience will be.
That's what makes it such a great option to have as a preconstructed deck. It'll provide experienced players with a fun new take on a classic archetype while giving newer players a chance to try it for the first time.
I've only covered a handful of upgrades that lean into the sacrifice theme specifically. There are several other ways you can make it your own, like finding methods to capitalize on the life gain subtheme more heavily. It's a great opportunity for you to build up on the elements you enjoy the most so you can have a great time at your next Commander night.
Paige Smith
Bluesky: https://bsky.app/profile/themaverickgirl.bsky.social
Twitch: twitch.tv/themaverickgirl
YouTube: TheMaverickGal